Can You Upload Journal Entries Into Quickbooks Online
For 1 more case, imagine that you are recording a $1,000 payment in cash from a client. You will debit the cash business relationship, which is an asset, so the business relationship volition increase. You lot will so credit accounts receivable, which is also an asset account, but decreases rather than increases. The residue sheet formula remains the same because the avails are increased and and so decreased past the aforementioned amount.
Now that you've seen how debits and credits work, let's see with how you create a journal entry in QuickBooks Online.
Creating a Journal Entry
To create a new journal entry, you tin can first past clicking the New push in the left-side Navigation Pane. Then, choose Periodical Entry under the Other category.
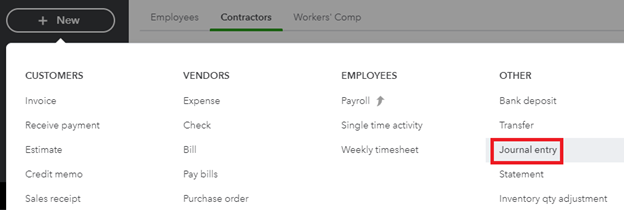
[Figure: Getting to the new Periodical Entry folio]
One time y'all get to the Journal Entry folio, you will encounter that there is a date and journal number at the top. There is likewise a settings button where yous can configure warnings if duplicate journal numbers are used.
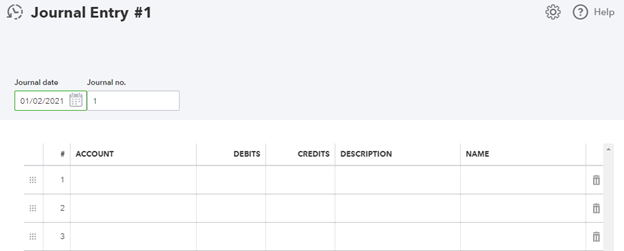
A journal entry has several lines in it. For a basic entry, yous volition take money out of 1 account and put information technology into another.
For this example, allow's take $100 out of 1 business relationship and put information technology into another. On the first line, pick an business relationship from the Business relationship dropdown and the enter $100 into the Debits field.

[Figure: Debiting an account using a Journal Entry]
Now on the second line, nosotros will add together $100 to another account. Choose another business relationship from the Business relationship dropdown and enter the same amount you debited from the first business relationship into the Credit field.

[Effigy: Crediting an business relationship using a Journal Entry]
Now you lot have used a Journal Entry to transfer money from one account to another. The transaction is balanced considering equal amounts left 1 nugget account and entered another nugget account.
At that place are numerous other things that yous tin do. Let's see how you tin can use a Journal Entry to show depreciation of an asset.
Using a Periodical Entry to Show Depreciation
Many assets volition lose value over time, and so one of the most frequent uses of a Journal Entry is to report depreciation. Nosotros tin can record this in the Depreciation account. Create a new Journal Entry, and on the first line, choose the Depreciation account in the Account field.

[Figure: Choosing the Account in a Journal Entry]
Next, fill in the amount that you are depreciating in the Debits field. Likewise, write in a clarification of what you are doing and then that you or another auditor will understand the transaction afterward.

[Figure: Inbound the amount and clarification of a journal entry]
On the 2d line of the journal entry, you need to select the account for that asset that you are depreciating. In this example, it is a sub-account of the chief asset.
Make certain that the aforementioned corporeality yous debited in line 1 is in this line'due south Credits column. This and the Description field should be filled in automatically by QuickBooks Online for you.

[Figure: Entering the second line of the Journal Entry]
You lot can now click the Salve and Close button at the lesser of the page to finish with the Journal Entry.
Now that y'all've seen how to make journal entries, allow's encounter what you can do when you desire to reverse one.
Reversing a Periodical Entry
If you've made a fault in 1 of your journal entries, you can contrary information technology.
First, become to the Chart of Accounts. You can find the Chart of Accounts past clicking on the gear-shaped Settings icon in the Header. Information technology is nether the Your Company heading.
At the Chart of Accounts, locate the account that you created the entry for. Select View Register from the Action column.

[Figure: Finding the account with the journal entry you want to reverse]
Once you get to the register, search for the journal entry. It will say "Journal" in the Reference Number Type cavalcade.
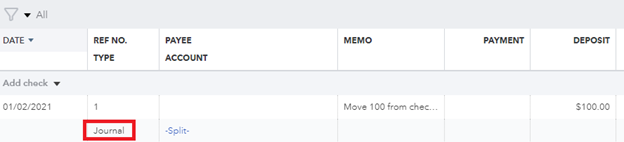
[Effigy: Finding the journal entry in the annals]
Click on the periodical entry and yous will be able to change some fields. Click on the Edit push to be able to make more detailed changes.

[Effigy: Clicking the Edit button to make more than edits]
Once you click the Edit button, you will encounter the Journal Entry page with the relevant journal entry data in it. To reverse the journal entry, click the Reverse push button at the lesser of the folio.
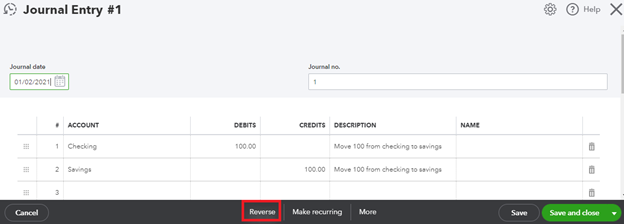
[Figure: Finding the Reverse push button on the Journal Entry page]
After clicking the Contrary button, click the Save and Shut button at the lesser of the screen to save your reverse.
Dorsum at the register, y'all will see a new journal entry that reverses the previous one. It will have the aforementioned journal number, simply adds the letter "R" to bear witness that it is reconciled. It will also be dated the first day of the adjacent month.

[Figure: The new journal entry reversing the previous one with "R" added and a new date]
Other information in the new periodical entry, such every bit Account, Name, and Description, remains the same.
In addition to reversing a journal entry, you tin can also delete one entirely. We'll hash out that in the next section.
Deleting a Periodical Entry
A journal entry that was made past mistake can be deleted, although you should be careful that yous don't unbalance your accounts.
To delete a periodical entry, go to your Chart of Accounts, just as yous did to reverse a journal entry. You tin discover the Chart of Accounts in the Accounts tab in the left-side Navigation Pane.
At the Chart of Accounts, observe the account that you are looking for and click View Register in the Activity column. Locate the periodical entry in the register. You can filter out other entry types past clicking the filter icon and selecting Journal Entry from the Transaction Type dropdown.

[Figure: Using the Filter tool to select only journal entries in the register]
Once you've plant the journal entry, expand information technology past clicking on it. When it'south expanded, you volition run into a Delete button at the bottom of the row. Click the Delete button to delete the journal entry.

[Figure: Deleting the periodical entry]
If your journal entry is one half of a divide transaction, y'all will receive a alarm saying that the whole transaction will be deleted. Click the Yes push at this screen to continue. Your periodical entry volition at present exist deleted.
Although nosotros previously fabricated single, one-time journal entries, you can also make them recurring. Nosotros'll see how in the following section.
Creating Recurring Journal Entries
To make a recurring journal entry, showtime a new periodical entry just like we previously did in this lesson. In the Journal Entry course, click the Recurring button at the bottom. That will modify the page to a Recurring Journal Entry.
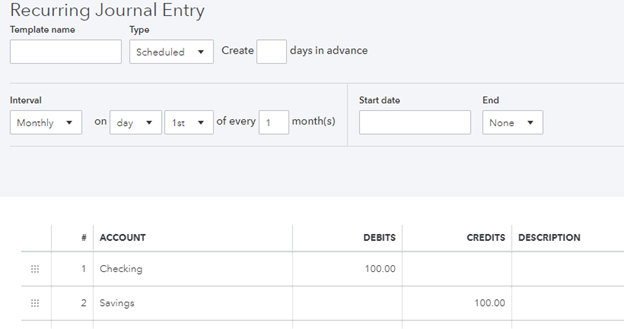
[Figure: A recurring journal entry form]
With this course, you tin can set the journal entry to occur on any schedule that you want. This can be used to automatically pay bills or, every bit in this case, move money into a savings business relationship regularly.
At present that you accept some experience creating journal entries, let's see how you lot tin view them in the Transaction Periodical.
Viewing Journal Entries in the Transaction Journal
Whenever you use QuickBooks Online, you are making a series of events that are added to a general ledger. This process creates journal entries behind the scenes.
For example, if you lot paid a check to someone, y'all would typically do that with the New push button on the left-side Navigation Pane and selecting Nib from the Vendors category.

[Figure: Paying a beak with QuickBooks Online]
That process can be expressed in journal entries. After saving and endmost your pecker payment, you lot can run into how the transaction looks by viewing information technology in the Transaction Periodical.
To get to the Transaction Journal, click on the gear-shaped Settings icon in the Header and get to Audit Log under the Tools category.
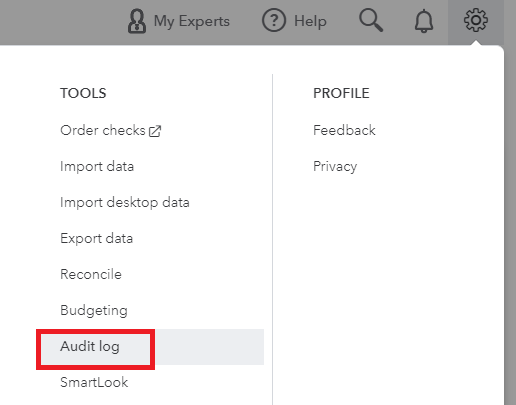
[Effigy: Finding the Audit log]
At the Audit Log, you can view all the events that take occurred in the system. Events include things like sign ins and sign outs, budgets, recurring templates, settings, reconciliations, transactions, lists, fourth dimension events, statements, sales customizations, and data exchange.
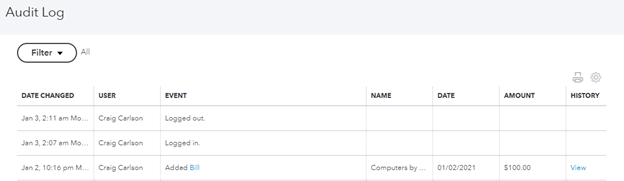
[Effigy: Recent events in the Audit Log]
To see but the transactions, click on the Filter dropdown and select Transactions from the Show Simply These Events radio button.
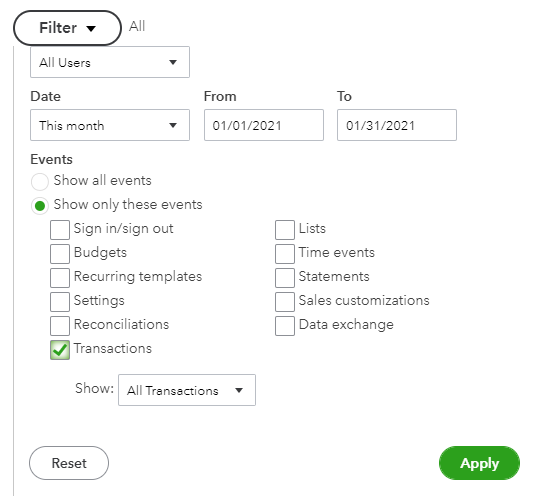
[Effigy: Viewing only transactions]
Click the use push and you will meet that bill that was added in the table. The table includes a History column with a link to view the transaction.

[Figure: Viewing but transactions in the table]
Clicking on the View link opens up a detailed view of the transaction. Y'all can see how the transaction afflicted accounts.
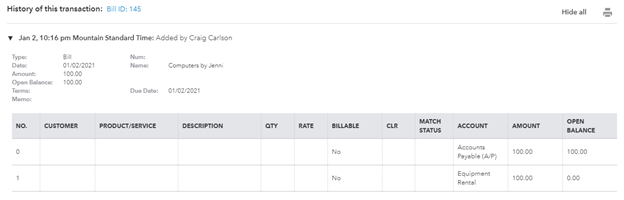
[Figure: View of the transaction]
In addition to seeing transactions in the Audit Log, you tin also view journal entries in a report. We'll take a look at that right at present in the next department.
Creating a Journal Entry Report
Y'all can view a report of journal entries by going to Reports and scrolling to the report chosen Periodical in the subsection For My Accountant. Yous tin can also merely search for Journal from the search bar at the top of the Reports page.
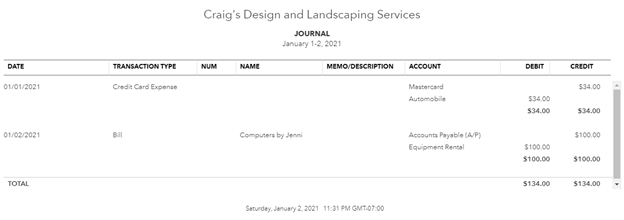
[Figure: The Journal study]
You tin customize this study to only show journal entries by clicking on the Customize push button at the top of the written report. This will open up a panel where you can set all sorts of options. Click on the Filter section and select Journal Entry to just prove journal entries.
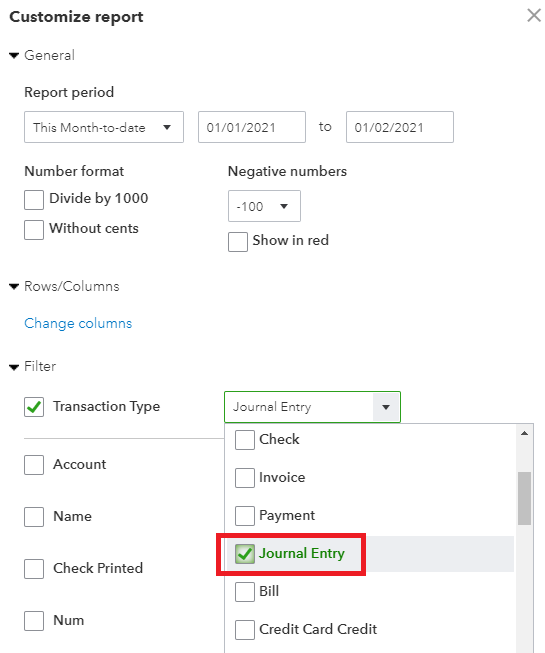
[Effigy: Running only journal entries in the study]
Now that you've seen how to make a report with journal entries, we'll take a look at one more topic related to journal entries, which is importing journal entry files.
Importing a Journal Entry File
Being able to import periodical entries is an important process because you may have transaction you want to import from other accounting software. Unfortunately, importing periodical entry files is a procedure that isn't fully supported in every region that QuickBooks Online is bachelor in.
If the process is non available to you lot, then you can import periodical entries through a 3rd political party addition. One such add-on is called Transaction Pro. In this section, notwithstanding, we will look at using QuickBooks Online'due south solution to importing journal entries, as information technology may exist more than widely bachelor at a later date.
The file that y'all import should be a CSV or Excel file. Before importing a journal entry, brand certain that you lot turn off business relationship numbers in your Chart of Accounts. You tin turn off account number by clicking on the gear-shaped Settings icon in the Header and choosing Accounts and Settings from the Your Visitor heading.
And then, go to the Avanced tab and click the pencil-shaped Edit icon in the Chart of Accounts Section. Brand sure the Enable Business relationship Numbers is turned off. Click the Save button when you are done.
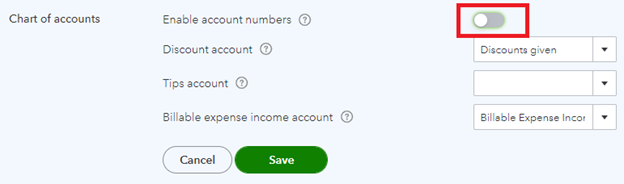
[Figure: Turning off business relationship numbers for the Chart of Accounts]
In one case you've confirmed that account numbers are turned off, make sure that your spreadsheet file is prepared correctly. The file that you are importing should take the following data:
Furthermore, check that y'all accept every account mentioned in the file added to your Nautical chart of Accounts already.
If yous don't take the account already, you tin can create it from the Nautical chart of Accounts. You can do this by getting to the Chart of Accounts past clicking on Accounts in the left-side Navigation Pane. One time at that place, click on the New push button at the Chart of Accounts.
Choose the Type and Particular Type for the business relationship, and make sure that the Proper noun is the same equally in the file.
Once you take everything ready to import, yous can get-go importing by clicking on the gear-shaped Settings icon in the Header. From there, choose Import Data under the Tools heading.
From the Import Information screen, choose Periodical Entries. On the next page, click Browse to find and select your CSV or Excel file. Select Open and so click Next.
Then, you lot will need to map your information. This involves matching the fields with the headers on the spreadsheet. Once everything is matched, click Adjacent and and then Start Import.
When you are done, you can use the Search function to search for the transactions. Click on the magnifying glass icon in the Header to pop up a search window. At the lesser of the search window, select Advanced Search. On the avant-garde search, y'all can limit your results to journal entries past selecting Periodical Entries from the first dropdown card.
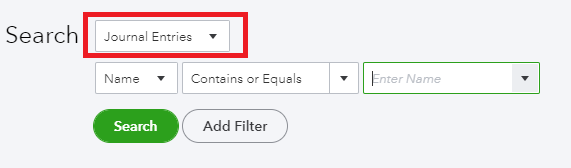
You should see your imported journal entries here if everything imported correctly.
Determination
In this article, we learned all about journal entries. You learned what they are used for and how to add, reverse, and delete them. You also saw how to run reports on them and import them from files.
Source: https://www.universalclass.com/articles/computers/how-to-make-journal-entries-in-quickbooks-online.htm
إرسال تعليق for "Can You Upload Journal Entries Into Quickbooks Online"