2010 Dodge Charger R/t Where Is Emissions Canister Filter?
Keeping the air we breathe arsenic halal as possible is the primary reason out wherefore today's vehicles have emissions control devices attached. The truth is that most fuels emit vapours that are non only dangerous for our environment, but when frequently inhaled can lead to several respiratory conditions including Chronic Obstructive Pulmonary Disease (COPD).
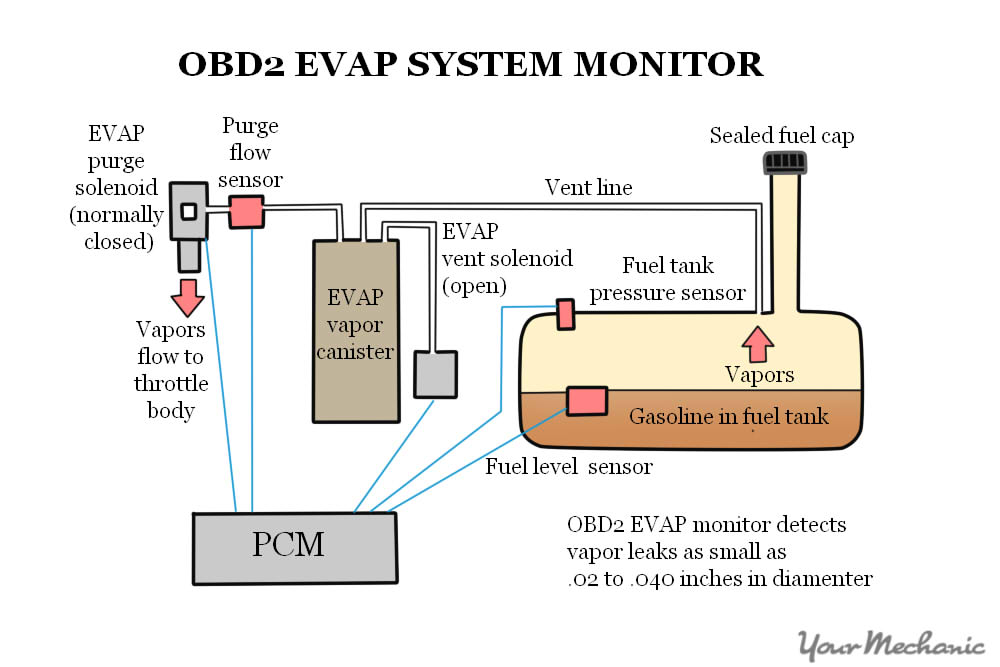
In an effort to reduce harmful emissions coming from unburnt fuel, a series of emissions control filters are installed within the vehicle's fuel system to remove potentially harmful hydrocarbons and to improve fuel efficiency inside the combustion chamber of the vehicle's engine. The component that filters most of the unburnt evaporation that collects inside the fuel tank is the evaporative emissions control tin.
The state change emissions control canister is attached to a fire hose that is connected to the fuel jail cell. The vapor or gases from the fuel cell enters the EVAP emissions operate canister shot and is circulated through a system of charcoal filters. Once the vapor enters the canister, two gases are converted. The first includes hydrocarbon, which is re-distributed through the EVAP regurgitate solenoid into the fuel scheme and is burned-out during the combustion process. The unessential gasconad that is emitted from the EVAP emissions canister is carbonic acid gas, which is exited from the tank by the EVAP vent solenoid and is widespread to the outside air.
Over a period, grunge, dust, and dust start to build inside the emission control case shot and typically impacts the operation of valves and ventilate solenoids that work in connective with the canister. If this occurs, it will render the EVAP system useless, which may result in emissions testing failure, See to it Locomotive Light staying on, and in some cases, the locomotive engine being unable to start payable to excess vacuum pressure sensation inside the fire cell.
When the EVAP emissions canister fails it triggers an OBD-II error code (0499) collected by the vehicle's ECM and tells a auto-mechanic that there is a squeeze trouble with the EVAP scheme. If the EVAP canister is damaged or non working properly, it needs to represent replaced, as it can't constitute serviced or repaired on the vehicle.
- Note of hand: For purposes of this clause, we volition discuss the stairs for removing and replacing the EVAP emissions control canister that is located in the back of the fomite OR connected the front of the vehicle. Always refer to your fomite's service manual for photographic operating instructions and location of the EVAP vent solenoid.
- Monition: Replacement the EVAP emissions control case shot bequeath require you to raise your vehicle on a hydraulic lift up or with jacks and jack stands. It bequeath too require you to remove business leader from the battery. Make sure enough to remove the positive and negative terminals from the battery earlier touching whatsoever components or removing any parts.
Voice 1 of 3: Determining the symptoms of a bad EVAP emissions control canister
Quite often, a problem with the EVAP system or emissions ascendancy scheme is electrical in nature or with sensors that supervise this system. In some cases, a problem with the EVAP canister will trigger an OBD-II erroneous belief encipher (P-0499) that indicates a pressure problem with the EVAP organization. There are a few warning signs that might besides argue that a problem with the EVAP emissions control canister exists including the following:
Check Locomotive Alight displays on shoot: When there is a problem with the EVAP emissions control canister, the Condition Railway locomotive Illuminated will showing on the frighten away. When a pressure sensation issue is noticed or excess emptiness is discovered in the fuel cellular phone, the ECM detects the issue and triggers the Check Engine Light to come on. This illuminating needs to be reset later on replacing the EVAP emissions control canister if that is the source of the erroneous belief encrypt.
Excess pressure inside the fuel cell: When the EVAP canister becomes thick or the charcoal inside the permeate gets saturated with too much moisture (which is caused past excess irrigate in the gasoline), the filter stops collecting vapor from within the fuel cell. This causes excess pressure sensation to build in the fuel army tank leading to reduced fuel pressure, to a fault much fuel blackmail and, in several cases, rugged fire lines or seals on the fuel cell. This activity triggers the Check Locomotive engine Lightheaded and other fuel scheme warning indicators.
Fire tank gauge doesn't work: Sometimes when there is excess pressure wrong the fire cell, the fuel tank gauge displays inaccurate information. This may indicate that there is a problem with the EVAP canister shot, which should follow inspected away an ASE certified mechanic.
A failed emissions tryout: The EVAP canister is a critical factor of emissions testing. If the canister is not functioning efficiently, it butt cause a vehicle to fail an emissions test.
Set off 2 of 3: Replacing the EVAP emissions control canister
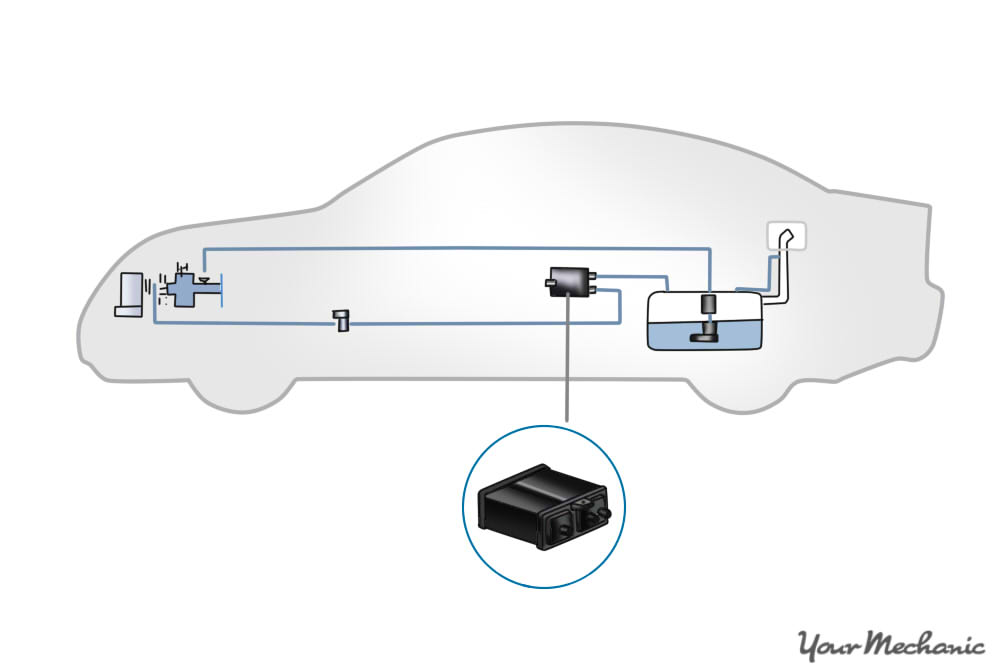
As we indicated above, there are unremarkably deuce different locations for the EVAP emissions control canister, nigh the fire electric cell and inside the engine compartment. Since the exact positioning of this component part is unique to the vehicle you're operative on, IT is highly suggested to purchase a service manual for the specific make, model and year of vehicle you're servicing. The service hand-operated typically gives you the exact placement of the EVAP canister along with special renewal steps As advisable by the engineers that created these vehicles.
Materials Needed
- Boxed end wrench or ratchet wrench
- Flashlight
- Flathead screwdriver
- Jack
- Jack up stands or hydraulic wind
- Knifelike oil
- Replacement EVAP emissions control canister
- Substitution vent hoses
-
Safety spectacles
-
Fee: Make a point to break off safety device glasses during all phases of this project as the potential for debris falling into your eyes is high when working underneath a vehicle.
-
Word of advice: If you reassessmen the information preceding surgery the steps below and have determined that this job is too complex or on the far side your comfort level, please come non attempt to replace the EVAP vent solenoid. One of our local ASE insane mechanics will be happy to wait on you.
Footfall 1: Disconnect the vehicle's barrage. Site the vehicle's battery and disconnect the positive and disconfirming bombardment cables in front proceedings.
The EVAP canister is attached to an electric harness.
Tread 2: Raise the rear of the vehicle. The EVAP emissions control canister is located on the driver side, near the rear tires.
Jackass up the vehicle from the recommended jack placement and send the rear of the vehicle along jack stands for support. Make doomed to keep squeeze on the Jack-tar after lowering the vehicle onto the jack stands for supererogatory safe.
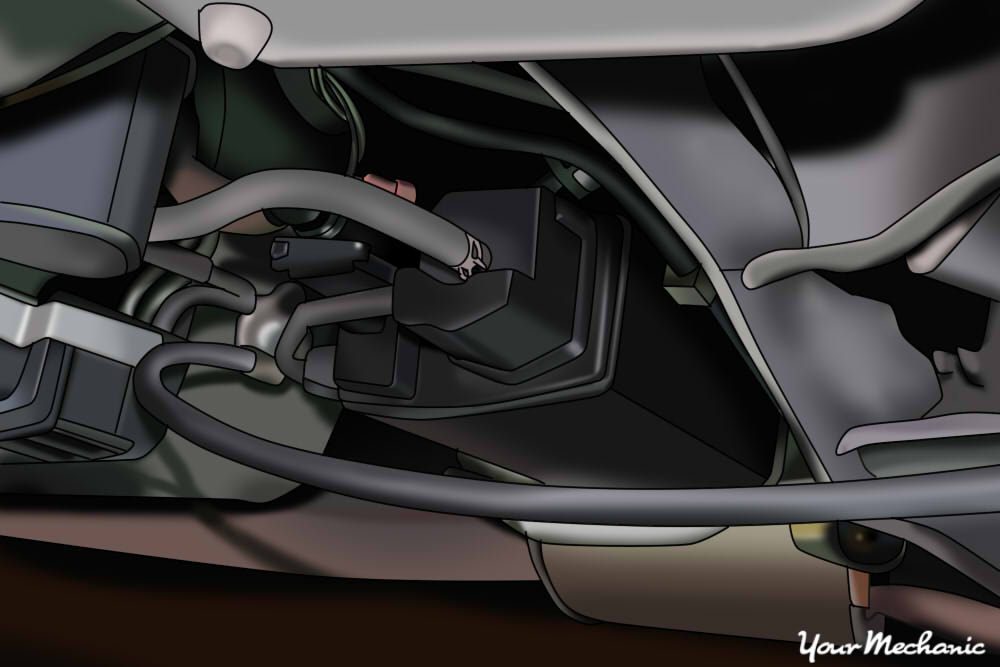
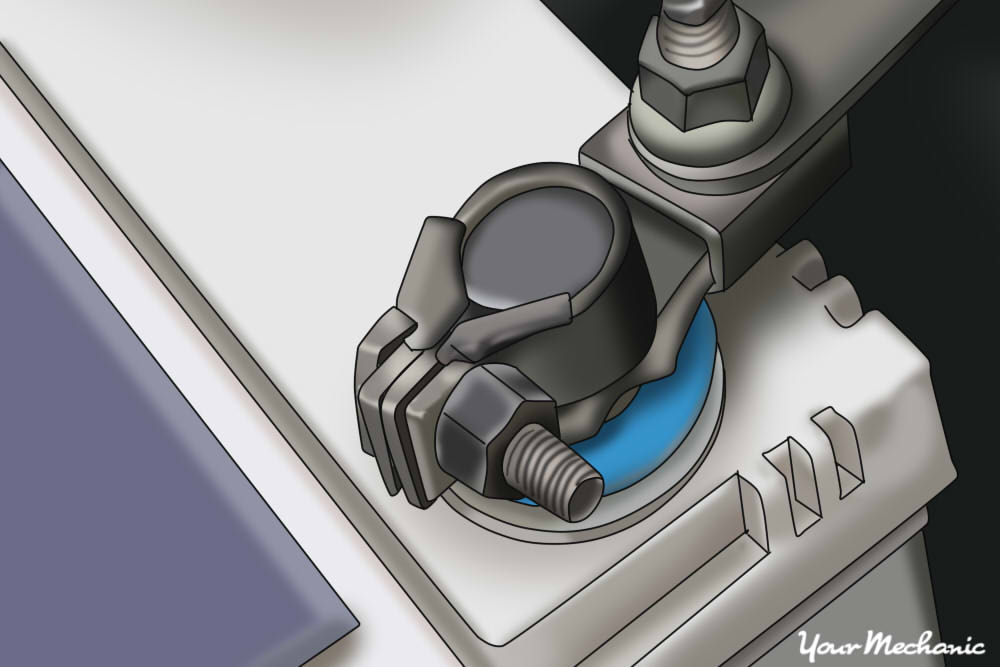
Step 3: Locate the EVAP case shot. On most domestic and foreign vehicles sold in the US, the EVAP emissions canister is set adjacent to the fuel cell.
It is shaped in a rectangular or orbicular design and has three evaporation lines attached to that. One line attaches to the fuel cell, one to the EVAP cast solenoid and one to the EVAP vent solenoid. There is also an electrical harness attached to this tin.
Step 4: Lubricate the bolts and slots with penetrating fluid. To avoid stripping bolts, spray penetrating smooth onto the bolts and the clips that hold the EVAP canister onto the vehicle.
Since this part has been unprotected to road grime, water and, in some cases, sharp; it's likely that the bolts have rusted. Spraying them with penetrating oil color will reduce the potential of denudation these bolts and save you a lot of time and frustration.
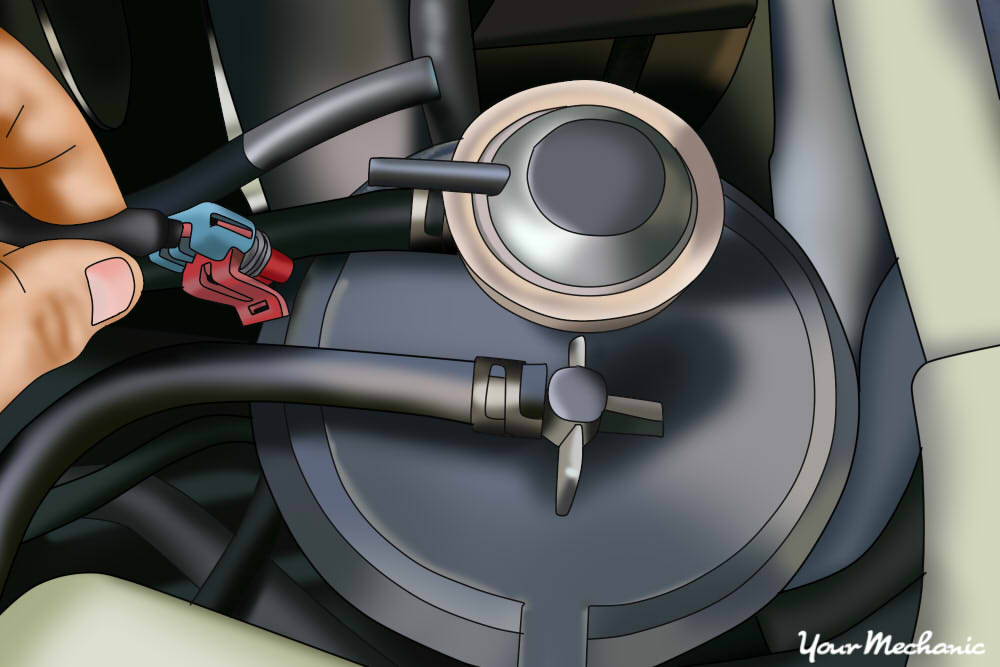
Step 5: Remove the electric harness. Once you've sprayed the bolts with acute oil, let that soak sure a while.
In the meantime, you'll notice that the EVAP canister has an electrical harness attached to the unit. Remove this harness by inserting a small, flat brand screwdriver into a slot that contains a weeny plastic clip. Lower the clip with the screwdriver and carefully remove the physical phenomenon harness from the EVAP canister.
- Crest: Along some canisters there will not glucinium an electrical harness. However, there should live a sensor or other electrical wire affiliated for monitoring the unit. Absent as instructed in your vehicle service extremity.
Step 6: Remove vent hoses from the EVAP canister. As described above, thither are typically three hoses related to the cannister: the EVAP venthole solenoid, the fuel cell, and the EVAP purge solenoid.
Remove all trinity of these hoses and clearly mark which hose attaches to the specific male fitting happening the EVAP emissions control canister. Exercise this away using masking tape recording and marker descriptions on the mag tape, then wrap tape on each hosepipe.
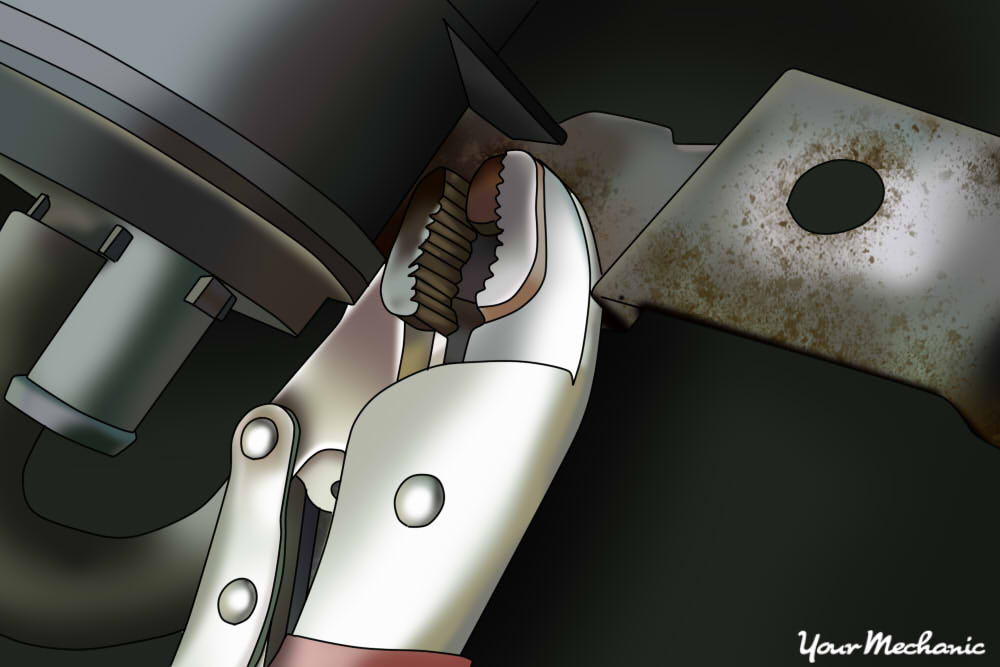
Footfall 7: Remove the bolt(s) holding the EVAP emissions hold canister. The EVAP emissions controller canister is attached to a bracket in two ways.
First, there are two bolts that unafraid the canister to a bracket. On some vehicles, a secondary set of clips secures the cannister to the vehicle's undercarriage. There are commonly indefinite or two bolts. Hit these bolts using a rachet up, elongation and a 10mm socket (in most cases information technology will be a 10mm).
Step 8: Remove EVAP case shot from the clips (if applicable). In many cases this part is attached to a series of clips connected the backside.
You force out gain access to these clips after you off the bolts. Exploitation a flat blade screwdriver, carefully depress happening the clip and lantern slide the EVAP emissions canister off the bracket.
Footmark 9: Remove the old EVAP emissions control canister. One time all wires, hoses, and clips stimulate been abstracted, the canister should well follow off.
Remove the old case shot and inspect it for whatsoever corrosion, holes or burn marks that may have contributed to failure.
Stride 10: Establis the new EVAP emissions master cannister. The installation of this component is an exact reversal to the removal.
Prior to installment the new canister, inspect the condition of the vent hoses. If they are worn, cracked or are showing signs of age, supersede them.
Step 11: Attach bolts and clips. Microscope slide the EVAP canister onto support clips (if applicable) and attach the EVAP canister shot to the angle bracket with the bolts.
Step 12: Reattach vent hosepipe and electrical harness. Anything that was distant should be reinstalled A before.
Step 13: Clean up underneath fomite. Before you finish the job, urinate certainly to murder all tools, debris, and hardware from under the fomite to avoid running over them with your vehicle.
Step 14: Lower fomite from jack stands.
Step 15: Reconnect shelling cables. Tighten the cable with a pull.
Percentage 3 of 3: Test driving the vehicle
A test drive for this rectify is actually very short, collectible to the fact that in more cases, the failure of this disunite volition show up at idle or commence. Yet, before you complete the test drive, it's important to start up the vehicle and clear any wrongdoing codes that previously were downloaded. This will generate you a "clean slate" in which to test the new EVAP emissions curb canister.
Step 1: Start the vehicle. Let it warm up to operational temperature.
Step 2: Check the dashboard to avow that the Check Engine Light does not come on. If IT does, you should shut the fomite off and complete a diagnostic scan.
The error codes have to be cleared connected all but vehicles after additive this service.
Step 3: Shut off the vehicle. After verifying that the check engine Oregon other lights are gone, shut the vehicle off.
If misplay codes continue to display, recheck your connections to the canister as it's viable that the air lines are installed wrong.
Step 4: Take the vehicle on a 10 knot road test. Takings home and verify that the Suss out Engine Light does not elucidat.
This job is fairly simple to complete; even so, since you're functional with the EVAP scheme and fire organisation, there may cost a couple of complex steps. If you've read these instructions and still don't feel 100% confident in completing this repair, please contact one of YourMechanic's local ASE certified mechanism to complete the evaporative emissions control canister shot successor for you.
The statements expressed above are solely for informational purposes and should be severally verified. Please discove our terms of service for more inside information
2010 Dodge Charger R/t Where Is Emissions Canister Filter?
Source: https://www.yourmechanic.com/article/how-to-replace-an-evaporative-emission-control-canister-by-timothy-charlet
إرسال تعليق for "2010 Dodge Charger R/t Where Is Emissions Canister Filter?"